air filtration|angle finder|appliques|apprenticeships|apron|archive|auctions|bits|blueprints|book|boston|bow|brand irons|bus|business cards|idea|names|oppurtunities|plan|by degree|calculator|calipers|carv|cata|cataues|channels|charlotte nc|chisel|clamp sets|class nyc|colleges|companies|corner|coupon|courses|craft|ideas|dado|dallas|depot|design|designs software|dividers|dogs|doors| dowels|draw software|drill press|bits|dust collection -|dust mask|ed respirator -|education|engineer|engraver|epoxy|


Showing posts with label furniture from reclaimed wood. Show all posts

Wednesday, April 16, 2014

the 'basque style' chestnut table

the 'basque style' chestnut table

 1/30/2014 .. we delivered the basque style table to its new home yesterday.  it's got a wonderful, up close view of magic mountain, a local ski resort, out the windows to the left.  the home has dramatic soaring ceilings, lots of light and an open barn like, yet cozy and comfortable feel.  it's a lucky table.
see the full story below
well, this one started back in august.  the clients sent me photos of 'an early 18th century "basque style" farmhouse table and a link to hastings antiques where there were pictures and descriptions, and the 'sold' price, $18,000.  not worrying to much about design copyrights, we set out and made the chestnut model above, based on the clients' desired dimensions and photos from the hastings antiques website.
click the photos to enlarge them ...
 
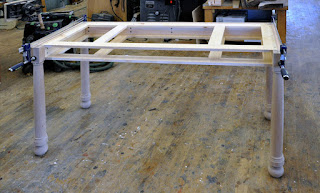
the photos showed a framed top with angled trestle supports and some diagonal bracing, not too 
our next step was the cad drawing below

then with some fine reclaimed chestnut from our friend jef harris in west virginia
 
we set to work
we mocked up the base, and, since the clients were local, we had them come by and check it out.  we added some spokeshaved softening and detailing to the top and base elements to add to the antique effect.

after some back and forth discussion, we agreed to fabricate the top with the solid wood frame around the solid wood center section, which was a concern to me because of the typical expansion and contraction of wood that happens during seasonal humidity swings in a vermont home.
we made the top up with the boards tight together and pocket screwed the parts temporarily.  and then before gluing the outside frame, we created a total of about 1/8th" of overall clearance between the boards in the center section for the projected summer expansion, based on 'the coefficient of expansion' (a technical term) of chestnut.  it's really an attractive design, and after our research, we're pretty confidant it's structurally sound, and will remain so over time .. after all, the original is 300 or so years old, and looks fine in the photos.
 we're in the finish process now
home stretch .. some sanding on the bench tops, and they are off to the finish room too.
 delivery later this week i hope ..

Sunday, April 28, 2013

a burst  of activity

a burst of activity

hmmmm .. busy time here in the designing and pricing and proposing department.  plus it's spring, which always cuts into the free time i usually have available for blogging.  this post will be more or less a continuation of one from the end of last month, where again, i didn't take the time to write in depth about specific projects.  i think, maybe too, the 'writing' is taking sort of a backseat to the enjoyment of 'living', for the moment at least.  getting out for five rounds of golf in april is pretty good for me. 
here's a quick april 'projects in the works' lineup, and some hints of what's to come in may ... click the photos to enlarge them ..
a claro walnut coffee table from the offcut of a previous dining table ... we keep 'em, and sometimes we get lucky, and someone needs one exactly the right size ...
this one's heading to chicago this week.  'industrial look' welded steel base by sam.
speaking of sam, the metal shop is humming, and he's cranking it out.  these are parts for some large turnbuckles that will hold a building together, where the second floor floor was removed.  there are four of them total ..
 that's 1" solid round stock bent into those graceful hooks .. turnbuckles from peak supply ...
and he fabricated and installed some new custom railing projects ...
i think this one was installed a couple of weeks ago ...


and these unusual objects will support wooden poles which a local message artist will hold on to while she walks on your back ... sounds interesting, but i haven't tried it yet ... a niche market for sure.
and next up we have the new design department.  this'll be a new kitchen, hopefully by this time next month ...
i finished the shop drawings using some uninterrupted time this weekend ... during the week, i often work from one interruption to the next, and drawings like these just don't flow for me unless i can concentrate.
and after a few sketches and cad iterations of this wall, we have a confirmed design for a long bedroom wall ... coming up in june sometime ...


another claro walnut coffee table ... waiting for it's base that will hopefully happen this week.  the 'ant attack' area is fascinating ..
and the pine sideboard is finished and gone, and now in its new home in stowe, vt ...
here we have another upcoming project that took some time to design and figure out.  it will be a credenza in a north carolina law office, along with the 'ant attack' table above.
 using claro slab cutoffs, we'll cut the short cut offs into veneers, and lay up the door and drawer face panels like a puzzle.  it will have a welded and polished steel base by sam.  i am looking forward to seeing this one get umderway.  it should be a fun one.
and this one, will whipped up week before last.  it's finished now, and i hope we can deliver and set it up in the client's home early this week.  shaker influenced design, simple detailing,

and will is currently, along with a couple of new banjos, working on this slightly smaller version of a lutyens style desk he built back in 2009.  luckily, in a couple of blog posts, we documented the process as we figured out the first time so he's got a little leg up on this one.  also, four additional years of practice doesn't hurt either ...
march, 2009 .. +/- 26 x 72
the new onw was starting to take shape by last friday ... still a long way to go though .. lots of detail.
and trevor whipped up this little 'rustic' coffee table last week.  it may not look so rustic in this photo, but now the base is distressed and pickled, the top has its breadboards, and the culry maple top will be distressed, stained and finished later this week.
and jim and sam made a couple of reclaimed oak tables in the 'bethlehem steel' style .. burned, and lightly distressed reclaimed white oak from west virginia ...

and, actually one of the larger projects we wrapped up this month has been ongoing since last september.  it will start to take shape, hopefully, by early july ... we have one more approval to go, and sam's new metal shop will start happening.  it's been a long slog, with lots of challenging permit related details, but i think we have cleared almost the final hurdle. we have received the loan commitment, and the last detail, which i will not mention for fear of jinxing it, will be approved by the 15th of may ... and then, my 'free' time will be gone.   'life is uncertain, golf now.'
ok, work on your pottery too

Friday, March 16, 2012

fun with lighting

fun with lighting

i've always been fascinated with light and lighting. the way it glows at night; the way it falls on wood to illuminate the figure and color ... it's all good. we've done a few things with it here and there .. hanging lamps over a dining table, pool table lights, (scroll down), free hanging chandeliers ... mostly kind of little stuff. recently though we have been talking with the contractor on the job where we did the reclaimed chestnut cabinets and it seems there is a distinct lack of light over the couches ... what to do? a hanging chandelier? there's a wire up there, but it's a loooong way to the ceiling.as you can see in the photo below. it seemed to sam and me that the next best choice was to make something between the beams about 9' up that would mainly light the couch and coffee table area, in other words, where you need the light. click the photos to enlarge them ...
sam had the idea of using square steel tubing to support the custom glass shades from our friend andrew at manchester hot glass that we could use to direct the light downward and mostly eliminate seeing the bulbs up there. we discussed dimmers...
we scratched it out on paper, did a little cad drawing roughly to scale, but none of our workings seemed to come across as something as exciting as we thought it could be ... i decided to get out of the office and make a model. we got the measurements from beam to beam and wall to wall from matthew, the contractor and we reduced it all to 1/8th scale. the 8 x 8s became 1" x 1"s, (convenient), and the 3 x 3 steel tubing became 3/8ths by 3/8ths, and the 2.5 square tube connectors became 5/16ths square ... nice round numbers.
we divided the 6' space into 5ths, subtracted the thicknesses of the tubing and arrived at a spacing of roughly 12" between the horizontals .. also convenient. i dotted them with yellow glue and nailed them carefully with the micropinner .. a few pins poked out but i trimmed them off or pulled them through .. we then sprayed the grid with flat black and constructed the half lapped 1 x 1 frame ... it was about at this point that we realized we woudl have to create access in the tubing frame to make the electrical connections and rout the wires from shade to shade. adding the wood 'caps' on top after the fact seemed like a logical option that would also add interest to the fixture ... i had to mockup the shades so i spun a dowel on and angle on the edge sander, cut it to length, drilled it and the frame on the drill press and hammered them home with 1.25 x 17 brads ... pretty slick...
i added the 8' foot posts, but it was still kind of hard to visualize the full effect.
well, there's always photoshop ... the first step was to get rid of the open area above the model by photographing it against a piece of black foam core ... that was a start.then i realized i could put it near the edge of the counter and photograph it looking up with the foam core on top .. viola .. now we're getting there.
then i robbed the shade image from andrew's website at manchester hot glass and dotted them onto the photo over the wood cones ... now we're talkin' ... i sent the two images above and the shade photo at the top of the post off to the clients and we're going to get together on it soon ... models and mockups and photoshop to the rescue again ...
these clients are used to my photoshopping from the last couple projects we did together. above is the before image, created by photoshopping a cabinet from my website into their space, and then, below,executing the photoshopped image ... visualization ... graphic communication ... it's not overrated.
more model posts here