air filtration|angle finder|appliques|apprenticeships|apron|archive|auctions|bits|blueprints|book|boston|bow|brand irons|bus|business cards|idea|names|oppurtunities|plan|by degree|calculator|calipers|carv|cata|cataues|channels|charlotte nc|chisel|clamp sets|class nyc|colleges|companies|corner|coupon|courses|craft|ideas|dado|dallas|depot|design|designs software|dividers|dogs|doors| dowels|draw software|drill press|bits|dust collection -|dust mask|ed respirator -|education|engineer|engraver|epoxy|


Showing posts with label models and mockups. Show all posts

Wednesday, April 16, 2014

the 'basque style' chestnut table

the 'basque style' chestnut table

 1/30/2014 .. we delivered the basque style table to its new home yesterday.  it's got a wonderful, up close view of magic mountain, a local ski resort, out the windows to the left.  the home has dramatic soaring ceilings, lots of light and an open barn like, yet cozy and comfortable feel.  it's a lucky table.
see the full story below
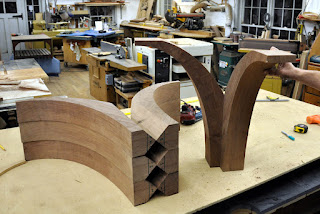
well, this one started back in august.  the clients sent me photos of 'an early 18th century "basque style" farmhouse table and a link to hastings antiques where there were pictures and descriptions, and the 'sold' price, $18,000.  not worrying to much about design copyrights, we set out and made the chestnut model above, based on the clients' desired dimensions and photos from the hastings antiques website.
click the photos to enlarge them ...
 
the photos showed a framed top with angled trestle supports and some diagonal bracing, not too 
our next step was the cad drawing below

then with some fine reclaimed chestnut from our friend jef harris in west virginia
 
we set to work
we mocked up the base, and, since the clients were local, we had them come by and check it out.  we added some spokeshaved softening and detailing to the top and base elements to add to the antique effect.

after some back and forth discussion, we agreed to fabricate the top with the solid wood frame around the solid wood center section, which was a concern to me because of the typical expansion and contraction of wood that happens during seasonal humidity swings in a vermont home.
we made the top up with the boards tight together and pocket screwed the parts temporarily.  and then before gluing the outside frame, we created a total of about 1/8th" of overall clearance between the boards in the center section for the projected summer expansion, based on 'the coefficient of expansion' (a technical term) of chestnut.  it's really an attractive design, and after our research, we're pretty confidant it's structurally sound, and will remain so over time .. after all, the original is 300 or so years old, and looks fine in the photos.
 we're in the finish process now
home stretch .. some sanding on the bench tops, and they are off to the finish room too.
 delivery later this week i hope ..

Tuesday, April 1, 2014

The Parrot Chairs ... Sketching in Metal

The Parrot Chairs ... Sketching in Metal


Inspiration Photo

Via a referral from a friend in Massachusetts, we were contacted by a client who had an interest in having Sam fabricate some 'parrot chairs'. The client had saved a picture from a magazine, but had no other details like measurements, what the front legs looked like, a close up of the parrott detail, etc. We agreed to make a mockup for a small fee and the results and their proposed changes are shown below. It took us a while to get to it as there were some 'thought problems' to work through such as how to bend the back legs/hoop piece with even a small amount of repeatable control. I'm sure these things are pressed out cold by the thousands in factories around the world, but unfortunately, we're not one of them. We ended up making a pretty elaborate jig that, with a few modifications, will work fine. The jig was essentially based on the one we use to steam bend backs for Windsor chairs, something we've been doing since the late 70's. Creating a new chair design is tough in any medium, as what you are really creating is a functional sculpture, something viewed from all four sides with small complications like comfort, durability, and repeatable production thrown in. Tough in wood, not much easier in metal ... We'll see if we get to build them .... It will be a challenge for sure if we do ....
The 'sketch'

Proposed changes to the 'sketch' ... click to enlarge

Back view

Test drive ...The seat needs to be wider in the front and the back needs to be tipped back a little more .... other than that, not bad for comfort ...

Friday, May 3, 2013

design is a process

design is a process

well, after about 35 years of this kind of work, i have come to really appreciate the process of design, as much as the event of making stuff, which also is a process, and not a list of a linear progression of steps.  we do something, analyze it, do something different, analyze that, and step by step, move it all forward in small increments.  to get to the model above, i've been working with the builder, the client, and two different designers for a couple of weeks now.  it was a lot of work, but i think we've got a handle on it now, and it has been interesting.  click the photos to enlarge them ...
it started with some architects sketches for a more or less traditional kitchen, with a pantry in a separate room off to the right.  
we went with that originally, and i had just finished my shop drawings below, when i was informed that there was a new designer on board, up from florida, with some new ideas of how the kitchen should look.
 
he wanted a more streamlined, clean and modern look ... 
 after quickly revising my drawings to reflect his initial input above, trevor and i visited the site again and waved our arms and pencils and cardboard around with everyone for a while, until i realized that it was going to be a little more complicated then that ...  i offered to make a scale model.  time was short, but we got on it 
so the site looked like below thursday afternoon ... 
and the model looked like below friday morning ... 
so after another meeting friday morning, it was back to the shop, and mid afternoon, back to the site with the model below, adjustments and additions completed ...hot glue and double cardboard ... nothing better
north and east
east and south ...
back to the new shop drawings monday ... a couple more model changes and we're good to go ...
so now, the confusing little room is gone, it all feels more open, clean and spacious, and, it's the
weekend 
1/26/2014 .. i felt i should add some photos of the finished kitchen

Wednesday, February 6, 2013

a double pedestal oval table

a double pedestal oval table


 this table is heading to california tomorrow.  it's been in the works for a while and we had a small glitch when it came to the final finish color .  it's a totally new color and today, will said ' we've got to get more of this stain'  ... it was hard to photograph, and how it reads is sensitive to how your monitor is set.  it's a really warm orange brown color .. click the photos to enlarge them.
close up
'earthquake handles'  .. i did mention california, didn;t i?
the client's original photoshopped image
this project started with an inquiry from a prospective client who had taken a image from my blog or website and photoshopped it himself to make it into something that better fitted the dimensions of his dining room.  basically, he stretched out the table below and added another pedestal.  brilliant, imho.

even though it was early in the corresponding stage and no money or commitments had changed hands, i was intrigued by the concept.  since we still had the drawings for the original table, and its model, it was a simple matter to create the new model. 
bird's eye view
there was some talk about earthquakes, (the client lives north of san francisco), and 'earthquake handles', which turn out to be something to hold onto if you have to get under the table in the event of the earthquake, the design work proceeded and eventually we struck a deal.
 
above is the cad drawing showing the origin of the curves for the base elements and the seating and plate layout.  room for 12 good friends at least.
handle and base layout
even though the table is over 50" wide and about 10.5' long, trevor managed to create a clever pair of interlocking 1/4 oval templates that allowed him to lay out the wood for the glue up below.
one of the boards was just about, but not quite, long enough and we lost about an inch in width and length creating the 'revised' oval.  not bad.  11' walnut matched sets are hard to come by, even from irion lumber.
after a rough cut with the jigsaw, trevor used the template and a top bearing flush cut bit to rout the table to final shape and add the aprons and stiffeners                                  
then, using the cnc, he cut the patterns for the base pieces.  on the original table, the pieces that ran the length of the table were longer than the ones that ran across the table.  after some study though, we decided that with two pedestals, the bases should be all the same.
bandsaw, sand, bandsaw, sand ... repeat as necessary.

then the pieces have to be mitered and dowels inserted to give the end grain of the curves some cross grain material for the lag bolts that attach the horizontals at the floor.  i missed it this table, but you can see photos of how that works in the post about the previous table, back in august 2010.  there is also a discussion there about strengthening the short grain where the top is attached also ...
fit it up ...
interesting shapes upside down too ..
sam's sample 'earthquake handle'  approved and good to go ... 9 more in the works ...
 
 reinforcing the short grain with long grain inserts to accept screws
 base only
with chairs


early on, we tried oval vs. racetrack ... oval won ...